Learning how to edit product photos is one of the highest-leverage skills in e-commerce. Professional-looking product images directly influence click-through rates, return rates, and conversion on marketplaces and DTC sites alike.
This guide walks you through a complete step-by-step editing workflow—from color correction to background removal to export—and shows where AI can safely take over the repetitive parts of e-commerce product photo editing.
Table of Contents
Why Product Photo Editing Matters for Ecommerce Sales
Enhancing product photos can boost click-through rates and sales—and the data backs this up. A study of 217 eBay auctions found that items with actual product photos instead of generic images generated more bids and higher final sale prices.
A separate study of roughly 75,000 images on peer-to-peer marketplaces confirmed that image quality strongly predicts both likelihood of sale and buyer trust.
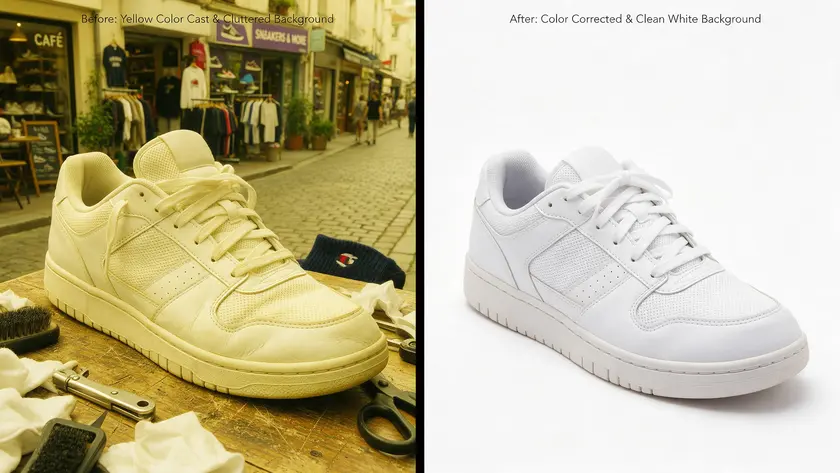
Here is a concrete example: imagine an unedited photo of a white sneaker shot under mixed lighting. It has a yellow color cast, a cluttered background, and the product fills only half the frame.
After editing—correcting white balance, adjusting exposure, removing backgrounds, and placing the shoe on a pure white background with the product filling roughly 85% of the frame—the image looks cleaner, color-accurate, and trustworthy.
Potential customers see exactly what they are buying, which reduces returns and complaints.
Effective editing relies on precise cleanup and color correction. The editing process for product photos usually includes exposure fixes, color correction, background removal, minor retouching, cropping, and export optimization.
A white, seamless background is best for product photos on most marketplaces. Background removal is essential for clear product representation. For glass, jewelry, and other tricky items, see our guide to removing the background from product photos.
This article covers the end-to-end editing process—not camera setup, lighting equipment, or software-specific tutorials. For the shooting side, our complete guide to ecommerce product photography walks through planning, setup, lighting, and angles before you ever open an editor.
What You Need Before You Start Editing

Before opening any editing tool, make sure you have:
A set of raw or unedited product photos
Shoot multiple angles and capture multiple shots of each product so you have options during the editing process.
A consistent shooting setup
A white, seamless background and steady framing (tripod recommended)—reduces distractions before you even open an editing tool.
Solo sellers editing a handful of product shots need different tools than a team processing hundreds of SKUs weekly.
Shoot and save in the highest quality available—RAW if your good camera or modern smartphone supports it. Starting from RAW means heavy edits like background removal or exposure corrections won’t degrade the final image the way repeated JPEG saves would.
How to Edit Product Photos in 7 Steps

Here is the editing workflow in the correct order. Doing these steps out of sequence wastes time because upstream changes (like exposure) affect everything downstream.
Solo sellers and growing catalogs need different tools—see our guide on choosing the right background removal method for a full comparison. AI tools can automate repetitive editing tasks like removing backgrounds or batch resizing.
The workflow below is tool-agnostic—these steps apply regardless of which photo editing software you use.
2. Correct Exposure, White Balance, and Color Accuracy
Get the base image right before anything else. Adjust brightness and contrast for better exposure—adjusting exposure reveals hidden details in product images that would otherwise sit in shadow.
Correct white balance to maintain accurate product colors and eliminate any warm or cool cast from artificial light or natural light. Enhance sharpness and clarity to improve image details, but save heavy sharpening for later in the process.
Use your editing tool’s histogram to confirm that highlights are not blown out and shadows retain detail. These exposure settings form the foundation for every step that follows.
3. Remove the Background
Background cleanup removes distracting elements and blemishes. This step is covered in depth in the dedicated section below, but the short version: isolating products using solid backgrounds meets e-commerce standards on Amazon, eBay, Walmart, and most brand stores.
AI tools can automate background removal for efficiency, making it practical even when you are processing multiple images.
4. Add a Clean Background
Once the original background is gone, replace it with a white background (RGB 255,255,255) for marketplace compliance, a light gray for a premium DTC look, or a brand-colored seamless background for your own storefront.
A clean background enhances product focus in images. Adding natural shadows can ground products visually—applying a subtle drop shadow prevents products from appearing cut out like stickers.
5. Crop and Resize for Consistency
Crop and straighten images to remove empty space. Maintain consistent framing across your catalog so every product listing looks cohesive.
Standardize dimensions across your catalog for consistency—a 1:1 square aspect ratio works for most marketplaces. Resize images to fit e-commerce platform requirements from a single high-resolution master file.
6. Clean Up Minor Imperfections
Remove dust spots, lint, small packaging dents, or wrinkled fabric texture. Using healing brushes—like the spot healing brush in Photoshop—cleans up small blemishes and imperfections.
Smooth out surface imperfections while preserving texture; you want the product to look its best without looking fake. Applying selective sharpening enhances the appearance of fine textures like stitching, grain, or embossed logos.
Sharpening improves clarity of product detail but should stay subtle. Retaining natural product features is crucial during retouching.
Use JPEG for high-quality images and PNG for transparency. Exporting images in sRGB maintains color accuracy across platforms and mobile devices.
Compress images using tools like TinyPNG for faster loading, and keep each file well under the platform’s size limit without losing quality. Use descriptive file names that include product keywords for search engines. The exact dimensions and formats per marketplace are covered in the specs table below.
Background Removal: The Non-Negotiable Step for Marketplaces

Background removal is now a baseline expectation on Amazon, Walmart, eBay, and most brand stores. It standardizes your catalog and removes distractions so potential customers focus attention on the product itself.
You can do it manually with selection tools and masks or automatically with AI—and AI is what makes this practical at catalog scale, not just for one photo. AI background removal tools in 2026 can process simple products in seconds and support batch processing across hundreds of SKUs.
Why Amazon, Walmart, and eBay Expect a Clean Background
Consistent backgrounds improve e-commerce image presentation across search results and category pages. When every product listing on a marketplace has a neutral background, shoppers compare products on merit rather than getting distracted by different room settings or tablecloths.
Marketplace compliance rules—covered in the specs table below—often require a pure white background for main product images.
Choosing Pure White, Light Gray, or Brand-Colored Backgrounds

- Pure white (RGB 255,255,255): Required for Amazon main images and strongly preferred on eBay. Use this for any marketplace listing.
- Light gray or off-white: Popular with premium DTC brands that want a softer, editorial feel on their own product pages.
- Brand-colored: Works for Shopify storefronts or social media where you want a consistent brand look across categories.
Placing products on clean backgrounds emphasizes their details. Creating natural shadows anchors products in a 3D space, so spend a moment adding a realistic shadow rather than leaving the product floating.
Handling Tricky Products (Transparent Bottles, Jewelry, Glassware)
Products with transparent surfaces, fine edges, or reflective materials need extra care. AI edge detection still struggles with glass, fur, lace, and crystal—often creating visible halos or jagged edges.
For these items, expect to refine edges manually after the first automated pass. Treat these as the exception: let AI handle the bulk of your catalog, and spend human time on the tricky 10-15%.
Keeping Color and Detail Accurate

Neutralizing color casts ensures true-to-life colors in product images. This matters most for apparel, cosmetics, and home decor—categories where a wrong shade of “forest green” or “dusty rose” drives returns.
Adjusting brightness reveals hidden details within products, while enhancing tones adds emotional appeal to product images without misrepresenting the item.
Boosting color saturation should be done carefully to avoid oversaturation. Match color across a product’s variant images so a backpack labeled “forest green” looks the same shade in every listing photo and from different angles. If you shot under consistent lighting, this takes minutes. If you didn’t, expect color correction to be the most time-consuming part of the editing process.
Scaling Up: Batch Editing and AI Automation

Editing product photos one by one doesn’t scale once a catalog reaches dozens or hundreds of SKUs. Five unnecessary minutes per product can total over eight hours of work across a 100-SKU catalog.
Batch editing can save significant time for multiple images—and using AI can automate repetitive editing tasks for efficiency.
What AI Can Safely Automate
Background removal, smart cropping, and bulk resizing across an entire batch shot under the same conditions.
If your multiple products were photographed in the same photo studio with the same exposure settings and lighting, syncing adjustments across the full set is fast and reliable. Batch processing is where the real-time savings live.
What Still Needs a Quick Human Check
Final color fidelity, edge quality on complex products, and the hero image for each listing. Automate the repetitive work, then spend human review time on the product shots that matter most—your best sellers and highest-traffic product pages.
Reusing approved images from previous shoots also reduces the need for repetitive edits when products haven’t changed.
Maintaining Consistency Across Your Catalog
Standardizing sizes and angles across product images improves consistency and gives your storefront a professional look.
Consistency in editing contributes to a polished e-commerce storefront—when a shopper browses a Shopify store with 200 home-decor SKUs, lamps and vases should all be framed at similar sizes with the same treatment on backgrounds, shadows, and color temperature.
Establishing clear editing standards improves catalog consistency. Save a repeatable batch-editing setup—whether that is a preset, a documented checklist, or an automation template—so every new product gets the same baseline.
Run a periodic catalog review (quarterly works well) to re-edit older, low-resolution, or inconsistent images that no longer match your current standards. Start with best-selling products for the biggest return on your time.
Product Photo Size and Background Requirements by Marketplace

Produce one high-resolution master image at roughly 2,500 × 2,500 px in a 1:1 ratio, then downsize for each platform. Here are the essential specs:
| Marketplace | Recommended Image Size | Background Requirement | File Format |
|---|
| Amazon | 2000 × 2000 px (enables zoom) | Pure white (RGB 255,255,255) for the main image; product fill ~85%+ | JPEG preferred; PNG, TIFF accepted; max 10 MB |
| Shopify | 2048 × 2048 px usually displays best; up to 5000 × 5000 px or 25 MP | No enforced color, but consistency across catalog matters | PNG is best, then JPEG; WebP accepted; files must be under 20 MB |
| Etsy | At least 2000 px wide and tall; first photo at least 635 × 635 | A clean background is recommended; a lifestyle allowed for secondary images | JPG or non-transparent PNG; files over 1 MB may be slow to upload. See our Etsy listing photo size guide. |
| eBay | 1600 × 1600 px | White or light gray preferred; product fill ~80-90% | JPEG, PNG |
Tip: Always keep your uncompressed master file. If a marketplace updates its image requirements, you can re-export without losing quality.
Common Mistakes When Editing Product Photos
| Mistake | Why It Hurts Conversions | Quick Fix |
|---|
| Over-saturation or over-sharpening | Looks fake at full zoom; creates halos around edges; breaks trust with potential customers | Dial back global saturation; use local sharpening only on product detail areas |
| Inconsistent white balance across images of the same product | Confusing color variation on the product listing; shoppers doubt which shade is accurate | Apply the same white balance preset to all images from one shoot; compare side by side |
| Over-aggressive background removal that clips edges or removes realistic shadows | The product looks like a floating sticker—unnatural and cheap | Feather selection edges; add a subtle drop shadow to anchor the product visually |
| No master file kept before compression | Can’t recover quality if a platform changes requirements or you need a different crop | Always save a high-res PSD, TIFF, or RAW master; export web versions from that master |
The entire editing workflow comes back to one outcome: consistent, accurate, marketplace-compliant product photos reduce returns and build trust at scale.
The editing process itself doesn’t need to be time-consuming—nail the order of operations, give every product the same treatment, and let AI handle the repetitive steps like removing backgrounds and batch resizing so you can focus on creating images that actually sell.
Key Takeaways
- Follow one complete editing workflow, from choosing a tool to exporting marketplace-ready files.
- Work in the right order: color and exposure correction first, then background removal, cleanup, and export—doing it out of order wastes edits.
- Keep product images accurate, with true-to-life color and shape, while using AI to speed up repetitive steps like background removal and bulk resizing.
- Export to each marketplace’s specs, such as Amazon, Shopify, Etsy, and eBay, so you can publish right after editing.
- Check the FAQ for what the workflow doesn’t answer directly, like how many images per product or when to outsource editing.
You don’t need to master every manual technique above to get a marketplace-ready photo. Upload your product photos to RemoveBackground.app and get a clean, HD background removed in seconds—whether it is one image or an entire catalog at once.
FAQ
How many product photos should I edit for each item in my store?
Most e-commerce brands aim for 4–8 images per product: a main hero image on a white background, multiple angles showing different product details, at least one close-up shot highlighting fabric texture or materials, and one or two lifestyle shots showing the product in use.
High-consideration products like furniture, electronics, or apparel may benefit from 10+ photos, including scale references, flat lay compositions, and texture close-ups from multiple angles.
Can I rely only on smartphone photos for e-commerce product photo editing?
Yes—modern smartphones can capture resolution suitable for online sales if paired with good lighting, a tripod, and careful editing. Mirrorless cameras still offer more control, but a phone shooting in its highest quality mode (or RAW if available) will work for most product listings.
Follow the same editing process regardless of camera: correct exposure, fix color, handle background cleanup, and export at the right size.
The editing workflow matters more than the camera body. For the shooting side, see our guide to shooting product photos with your phone.
Should I always remove the background from product images?
Background removal is required for marketplaces like Amazon (which has a pure white background mandate) and is strongly recommended on eBay. However, lifestyle shots with real environments can perform better on social media, brand sites, and secondary listing images.
The best approach is a mix: clean, background-removed images for catalog consistency and marketplace compliance, plus a few contextual images that show how the product is used.
Use a consistent background for your main product shots, and save environmental context for supporting images.
When does it make sense to outsource ecommerce product photo editing?
Outsourcing is worth considering when your catalog grows beyond what a small team can handle weekly—typically once you are regularly adding dozens of new SKUs and editing multiple photos for each.
It also makes sense when you need consistent, high-volume background removal and retouching that would otherwise eat into time better spent on sourcing or marketing.
Test with a small batch first, define clear style guidelines (background color, framing, and shadow style), and keep final approval of color accuracy and key product detail in-house.
How often should I re-edit or update existing product images?
Review core product images at least once a year, or whenever branding, packaging, or platform image requirements change. Encourage upgrading older, low-resolution, or inconsistent images gradually, starting with best-selling products that will show the biggest improvement in conversions.
A quarterly audit of your top 20 SKUs is a practical rhythm—it keeps your storefront looking current with accurate visuals and sets proper expectations for shoppers without requiring a full catalog overhaul at once. Use virtual model generation or updated lifestyle shots if your brand positioning has evolved.