
Need to remove background from image in PowerPoint without leaving your presentation? Whether you are cleaning up product shots, logos, or headshots, PowerPoint has built-in tools that handle the job directly on your slide.
This guide walks you through every native method—the Remove Background tool for complex photos, Set Transparent Color for flat backdrops, and AI-assisted removal via PowerPoint Online or Copilot.
Table of Contents
Introduction: Why Remove Background from Image in PowerPoint?
A cluttered image background pulls attention away from your message. Removing it lets your subject sit cleanly on the slide, makes text easier to read, and gives your PowerPoint presentation a polished, professional look without opening a separate photo editor.
Background removal in Microsoft PowerPoint means making the image background transparent so only the foreground subject remains visible. The result is a cutout you can layer over gradients, brand colors, or other background images—no white box in sight.
This article focuses exclusively on PowerPoint for Windows, Mac, and PowerPoint Online. You will learn step-by-step methods for every built-in background removal tool, see a quick comparison table, handle tricky images, and export the final transparent picture.
Quick Comparison: PowerPoint Background Removal Methods
Choosing the right method depends on your image type and which PowerPoint version you are running. Here is a side-by-side breakdown.
| Method | Best For | PowerPoint Version | Manual Control | Speed |
|---|
| Remove Background tool | Photos with complex or busy backgrounds | Desktop: 2016, 2019, 2021, Microsoft 365 | High—mark areas to keep/remove. | Moderate |
| Set Transparent Color tool | Logos, icons, graphics with a single solid fill color | Desktop: 2016, 2019, 2021, Microsoft 365 | Low—one-click, one color | Very fast |
| AI removal (PowerPoint Online) | Quick edits in a browser, fine detail like hair | PowerPoint Online (Microsoft 365) | None—fully automatic | Fast |
| AI removal (Copilot / Edit Image) | Desktop users with Copilot license, complex edges | Microsoft 365 desktop with Copilot | Limited refinement | Fast |
When to pick each method:
- Use the Remove Background tool when your photo has a busy background with different shades, patterns, or gradients.
- Use Set Transparent Color when the image background is a uniform white, black, or brand color block.
- Use AI removal in PowerPoint Online or Copilot when you need a one-click solution and are comfortable with less manual control.
All three approaches work directly on an image in PowerPoint—no separate photo editor subscription required.
Before You Start: Choose and Prepare the Right Image
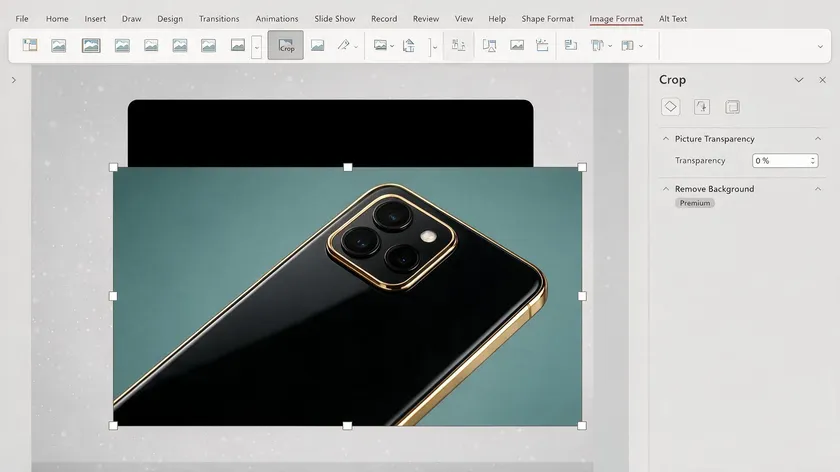
Good input makes every editing tool work better. Using a high-resolution image helps achieve better results in background removal because PowerPoint has more pixel data to distinguish edges.
Pick pictures where the subject clearly stands out from the image background in color and brightness. Avoid tiny, pixelated, or heavily compressed photos—the Remove Background tool will struggle with edges on those files.
A few quick pre-edits inside PowerPoint go a long way:
- Crop away empty margins via the picture format tab → Crop so the tool focuses on the true subject.
- Boost separation using Picture Format → Corrections to push brightness or contrast between the subject and background.
Images must be in JPG or PNG format for background removal in PowerPoint. The Remove Background tool is unavailable for vector file formats such as scalable vector graphics (SVG), Adobe Illustrator graphics (AI), or Windows Metafile Format (WMF/EMF). If you have a vector, right-click it → Save as Picture → PNG, reinsert the PNG, and then proceed.
The Remove Background feature—documented in Microsoft’s own support guide—is PowerPoint’s most powerful built-in option for photos. It uses automatic detection to separate foreground from background, then lets you refine edges manually. The Remove Background tool works best with clear subject-background contrast—think a person against a plain wall or a product on a tabletop.
The workflow is nearly identical across Microsoft PowerPoint 2016, 2019, 2021, and Microsoft 365 on both Windows and macOS.
Step 1: Insert and Select Your Picture
Go to the insert tab → Pictures → This Device (or Stock Images / Online Pictures) and drop a photo onto your slide. Once the image is selected, the picture format tab—labeled “Picture Format” in newer versions or “Picture Tools → Format” in older ones—appears in the ribbon.
Crop unnecessary margins before background removal so PowerPoint focuses on the true subject rather than wasting processing on irrelevant space.
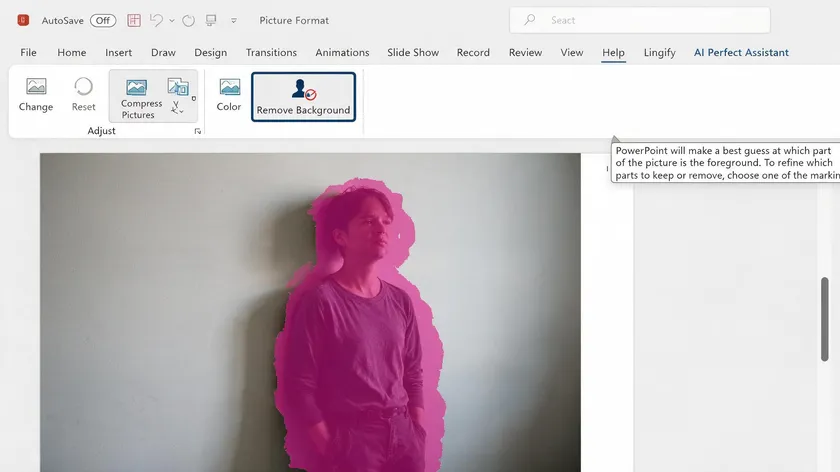
To remove a background in PowerPoint, select the image and click “Remove Background” in the adjust group of the “Picture Format” tab. This button only appears when a bitmap picture is selected.
PowerPoint’s Remove Background tool highlights the background in magenta while leaving the subject in its original colors. Think of the magenta as a preview of what will disappear. This overlay is temporary—nothing changes permanently until you confirm.
Step 3: Adjust the Selection Box Around the Subject
A rectangular selection boundary with resize handles appears around the entire image. Drag these handles inward so the box tightly frames just the subject—excluding as much empty or irrelevant default background area as possible.
A tighter selection improves edge detection and reduces cleanup on complicated sections. This step alone can fix many misdetections before you touch any other tool.
Step 4: Use Mark Areas to Keep / Mark Areas to Remove
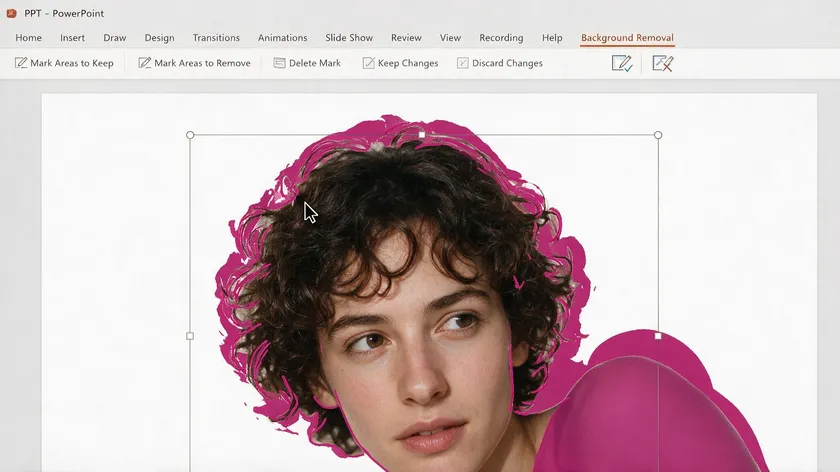
The background removal tab appears at the top of the ribbon with two key tools: mark areas to keep and mark areas to remove. PowerPoint allows manual adjustments using these tools to fine-tune the mask.
Select mark areas to keep and draw short strokes on subject areas that turned magenta. Select mark areas to remove and draw lines through background patches the tool missed. Use the free form drawing pencil for curves when a simple click is not enough.
For cleaner cuts, zoom in on complicated edges before marking—press Ctrl + scroll on Windows or Cmd + scroll on Mac. Each stroke updates the mask in real time, so you can see the effect immediately. If the background removal doesn’t work well, spending time refining the areas is recommended rather than starting from scratch.
Step 5: Confirm, Reset, or Fine-Tune the Result
Click Keep Changes to apply the background removal effect. The picture background disappears, and you are left with just the subject on the slide. If the result is off, click Discard All Changes to restore the original picture—or press Ctrl+Z (Cmd+Z on Mac) to undo background removal instantly.
You can reenter the Remove Background tool at any time to fix leftover artifacts, halos, or missed patches. For images where the tool simply cannot cope—very low-contrast selfies, for instance—starting over with a better source image or switching to an AI background removal tool will save time.
Method 2: Remove a White or Solid Picture Background with “Set Transparent Color”

PowerPoint’s Set Transparent Color option is suitable for uniform-color backgrounds. It is the fastest way to strip a flat white, black, or other color backdrop from logos, icons, and simple graphics—one click and you are done.
This method is not designed for photos with gradients, shadows, or multi-tone walls. Stick to the Remove Background tool or AI methods for those.
Here is the click path: (1) select the image, (2) go to the picture format tab → Color dropdown menu → Set Transparent Color option, (3) click once on the background color you want to eliminate. PowerPoint removes that specific color throughout the entire image.
Be aware that the same image may contain matching colors inside the subject—white letters in a logo, for example. Those pixels will also disappear. If that happens, press Ctrl+Z to undo, then click a slightly different pixel with a different shade. Because the tool handles only one color shade at a time, it performs poorly on noisy or gradient backgrounds. Switch to the Remove Background feature or AI for those cases.
Method 3: AI Background Removal in PowerPoint Online and Copilot
Microsoft 365 now includes AI-powered editing tools that can remove the background from an image in a single click. These are especially handy for difficult images with fine details like hair, fur, or semi-transparent objects—scenarios where manual mark areas work is tedious.
The trade-off is control. AI-powered background removal is available in PowerPoint Online since early 2024, and newer desktop builds include similar capabilities via Copilot. But both give fewer manual refinement options than the classic desktop version of the Remove Background tool.
Option A: AI Background Removal in PowerPoint Online
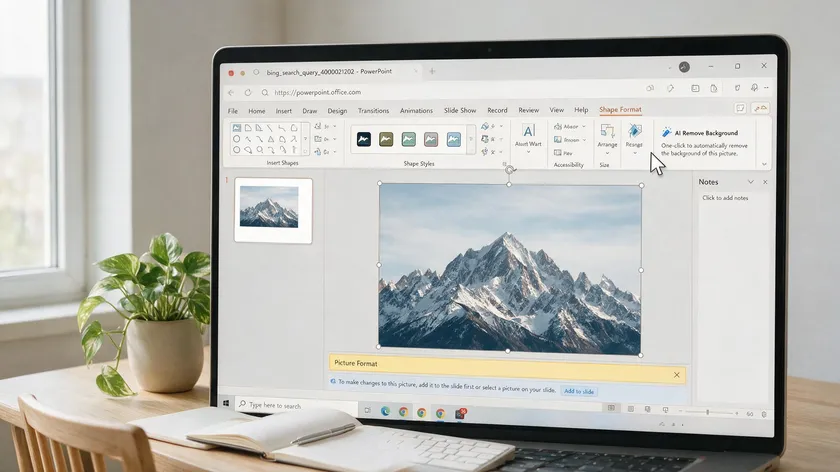
Open your presentation in PowerPoint Online through a browser. Select a picture, and the picture tab shows an AI-based remove background button. Click it, wait a few seconds for cloud processing, and the picture returns with the background removed.
PowerPoint Online lacks manual adjustment options for background removal. If the cutout clips into the subject or leaves artifacts, press Undo and try the desktop Remove Background tool or a dedicated removal service instead. PowerPoint Online is convenient for quick edits on the go but not ideal for complex production work.
Option B: AI Background Removal via Copilot in Desktop PowerPoint
In current Microsoft 365 builds with a Copilot license, selecting a picture may surface an Edit Image or similar pane. Choose Remove Background from the available editing tools and wait for the AI to process the cutout.
Copilot’s AI can better detect hair strands and complex edges than the standard engine, often reducing manual cleanup. If the Edit Image or Copilot button is greyed out, your license or tenant may not yet include Copilot access—check with your IT administrator.
How to Export a PowerPoint Image with Transparent Background (PNG)
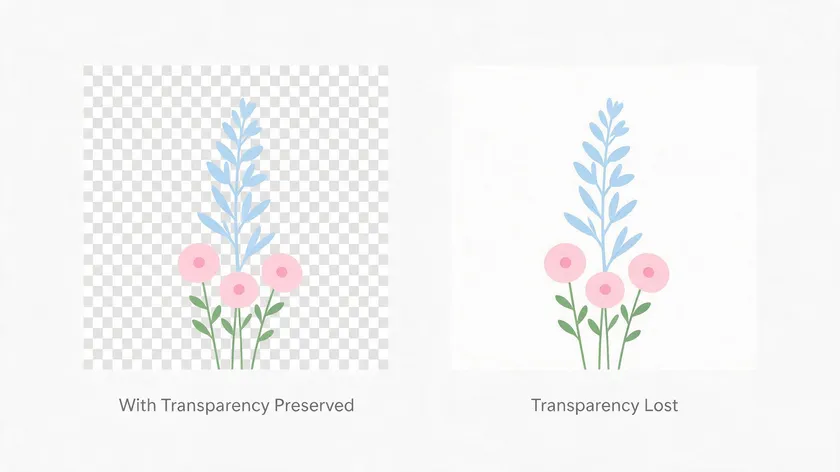
Transparency only survives if you export in the right format. Saving the cutout as a PNG preserves the transparent background. JPG does not support transparency and will fill removed areas with white.
Here is the export path: right-click the edited picture → Save as Picture → choose PNG format from the dropdown menu → pick a folder and filename → click save.
Test the exported file by inserting it into a new slide or another app to confirm the transparent background is intact. If you need higher DPI for print, you can adjust PowerPoint’s export resolution through registry settings on Windows—a deeper guide on that topic deserves its own article.
Troubleshooting: When PowerPoint Background Removal Goes Wrong
Even with the right method, things can go sideways. Below are the most common reasons the remove background feature misbehaves and how to fix each one:
The remove background button disappears or stays inactive if the selected object is a vector (SVG, EMF, WMF), an icon, or part of a slide master layout.
Convert vectors first: right-click → Save as Picture → PNG, reinsert the PNG, then click “Remove Background” again. If the image lives in the slide master, go to View → Slide Master, select the image there, or copy it to a normal slide before editing.
Problem 2: Low Contrast or Very Busy Background
Symptoms include PowerPoint marking parts of the subject as background, the magenta overlay jumping across clothes, or patterned walls confusing the tool. PowerPoint’s Remove Background tool struggles with low-contrast images, and the tool often fails on complex backgrounds with multiple colors.
Try these fixes:
- Increase contrast or brightness using picture format → Corrections before running Remove Background again.
- Crop tightly around the subject so the tool analyzes less noise.
- Manually use mark areas to keep and mark areas to remove on tricky edges, refining edges stroke by stroke.
If the photo is extremely noisy—crowd shots, dense foliage—a specialized background removal tool will usually give cleaner results than PowerPoint alone.
Problem 3: Leftover Halos, Jagged Edges, or Artifacts

Faint outlines or jagged pixels often appear around hair, dark clothes, or against high-contrast slide backgrounds. Reenter Remove Background and use mark areas to remove with short strokes along the white outline or halo edge.
A visual workaround: place a colored shape or subtle shadow behind the subject to mask minor artifacts. You can also export as PNG and inspect it on a checkerboard transparency background in another app to spot tiny leftover pixels.
Problem 4: Background Looks Transparent in PowerPoint but Saves as White
This happens when users export as JPG, because JPG does not support transparency. The fix is simple: select save as Picture → choose PNG, not JPG. There is no way to make a JPG carry transparency.

PowerPoint’s background removal is not ideal for professional-level cutouts. It was designed for quick slide edits, not full photo editing.
PowerPoint is good enough for the following:
- Simple white or solid backgrounds on logos and icons.
- Basic product shots for internal decks.
- Rough mockups or quick concept slides.
These cases don’t demand perfection, just a clean enough cutout to keep the slide readable.
A specialized tool is a better choice for:
- Marketing assets and client-facing decks where edges must be flawless.
- Detailed portraits with hair and jewelry.
- Large batches of images where manual mark areas work would be too slow.
If you need finer manual control over hair and edge detail than PowerPoint offers, our guide on how to remove a white background in Photoshop covers the same challenges with more precision.
Outside PowerPoint, several standalone tools exist for more demanding cutouts. Windows Paint 3D can remove image backgrounds for basic tasks, but for consistently accurate, presentation-ready results, a purpose-built AI background removal tool handles complex background scenes faster and cleaner than fixing messy results slide by slide.
Key Takeaways
- PowerPoint offers three native ways to remove a picture background: Remove Background for complex or busy photos, Set Transparent Color for flat white or solid-color backdrops (logos, icons, product shots), and AI removal via PowerPoint Online or Copilot for fast one-click results with less manual control.
- The best results start with a good source image—pick high-resolution pictures where the subject clearly separates from the background in color and brightness before running any tool.
- Transparency only survives outside PowerPoint if the edited picture is exported as PNG—saving as JPG will replace the transparent background with white.
- For high-stakes presentations, brand assets, or difficult busy-background photos, a dedicated background removal tool produces smoother edges and more reliable results than PowerPoint’s built-in tools, especially around hair and fine detail.
If PowerPoint’s built-in tools are not giving you the clean edges your slides deserve, try our AI background removal tool for faster, more precise cutouts on any image—no manual marking required.
FAQs: Removing Background from an Image in PowerPoint
These cover common edge cases not fully addressed in the step-by-step sections above.
Can I restore the original image after using Remove Background?
Yes. As long as you have not permanently flattened or replaced the image, you can select it, reopen Remove Background, and click Discard All Changes. You can also press Ctrl+Z (Cmd+Z on Mac) to undo background removal and return to the original picture. PowerPoint keeps the full image data embedded until you compress or replace it.
Does removing a background in PowerPoint change the original file on my computer?
No. PowerPoint edits are non-destructive for the source file. Changes apply only to the copy embedded inside the presentation. The original JPG or PNG stored on your disk remains completely untouched.
Can I remove backgrounds from multiple images at once in PowerPoint?
PowerPoint does not offer batch background removal. Each image must be edited individually using the picture tools described above. If you need to process many images, a dedicated online tool with batch support will save significant time compared to handling them one by one on each slide.
Is background removal available in the PowerPoint mobile apps?
As of 2026, the iOS and Android PowerPoint apps do not include the Remove Background or Set Transparent Color tools. For background removal tasks on the go, use PowerPoint Online in a mobile browser or switch to the desktop version when you are back at your computer.
Can I make an image partially transparent instead of removing the background?
You can select the image and use picture format → Transparency to fade the entire image, but this affects both the subject and the background equally. It is not the same as true background removal—use the format background or remove background tools if you want to eliminate the backdrop while keeping the subject fully visible.